
Red, White and Blue Mini Cheesecakes are the ultimate festive dessert for patriotic holidays, summer parties, backyard cookouts, and celebration tables. These creamy mini cheesecakes feature colorful layers of red, white, and blue cheesecake filling baked over a buttery vanilla wafer crust, then topped with fluffy homemade whipped cream and cheerful sprinkles. Every bite delivers a smooth, rich cheesecake texture balanced with a lightly sweet crunch from the cookie crust. Whether you’re planning a Fourth of July dessert spread, Memorial Day gathering, Labor Day celebration, or fun family baking project, these easy Red, White and Blue Mini Cheesecakes are guaranteed to stand out. Their bright layered appearance makes them Pinterest-worthy, while the classic cheesecake flavor keeps everyone coming back for seconds. Best of all, these mini cheesecakes are simple to make ahead and easy to serve for parties, potlucks, and festive dessert trays.
Introduction
There’s something instantly joyful about colorful layered desserts, especially when they’re individually sized, beautifully decorated, and made with rich creamy cheesecake filling. These Red, White and Blue Mini Cheesecakes bring together everything people love about classic cheesecake in a fun, festive presentation that feels perfect for celebrations big and small.
Mini cheesecakes are one of those desserts that look impressive without requiring complicated baking skills. Each cupcake liner holds a buttery vanilla wafer crust topped with vibrant layers of creamy cheesecake batter in patriotic colors. After baking, the cheesecakes are crowned with freshly whipped cream and sprinkles for a bakery-style finish that instantly brightens any dessert table.
These mini cheesecakes are especially popular during summer holidays because they’re easy to transport, easy to serve, and perfectly portioned for parties. Unlike a full cheesecake that requires slicing and plating, guests can simply grab one and enjoy. The layered colors create a striking visual effect while the flavor remains rich, creamy, smooth, and comforting.
The texture is what truly makes these Red, White and Blue Mini Cheesecakes unforgettable. The crust offers a soft buttery crunch, the cheesecake filling stays silky and luscious, and the whipped cream topping adds light airy contrast. Every layer works together beautifully, creating a dessert that tastes just as good as it looks.
Whether you’re preparing a patriotic dessert table, planning a summer birthday celebration, or simply looking for an easy cheesecake recipe with eye-catching presentation, these mini cheesecakes are guaranteed to become a favorite tradition.
Why You’ll Love This Recipe
- These mini cheesecakes are easy to make and beginner-friendly.
- The colorful red, white, and blue layers create a stunning presentation.
- Individual servings make them perfect for parties and entertaining.
- The creamy cheesecake filling pairs beautifully with the buttery vanilla wafer crust.
- They can be made ahead for stress-free party preparation.
- The homemade whipped cream topping adds a light and elegant finish.
Ingredients Breakdown
Servings
12 mini cheesecakes
For the Crust
- 1 cup (134g) vanilla wafer cookie crumbs
- 2 tbsp (26g) sugar
- 4 tbsp (56g) butter, melted
For the Cheesecake Filling
- 12 ounces (339g) cream cheese, room temperature
- 1/2 cup (104g) sugar
- 3 tbsp (24g) flour
- 1/2 cup (115g) sour cream
- 1 1/2 tsp vanilla extract
- 2 eggs
- Blue gel icing color
- Red gel icing color
For the Whipped Cream Topping
- 1/2 cup (120ml) heavy whipping cream, cold
- 5 tbsp (36g) powdered sugar
- 1/2 tsp vanilla extract
- Sprinkles
Ingredient Notes
Cream Cheese
Room temperature cream cheese is essential for creating a smooth cheesecake batter without lumps. It gives the mini cheesecakes their signature creamy texture.
Sour Cream
Sour cream adds richness and helps create a softer, silkier cheesecake filling with subtle tanginess.
Vanilla Wafer Cookie Crumbs
The vanilla wafer crust provides buttery sweetness and a slightly crisp contrast to the creamy filling.
Gel Icing Colors
Gel colors create vibrant red and blue layers without thinning the cheesecake batter.
Heavy Whipping Cream
Cold heavy whipping cream whips into fluffy stiff peaks for a stable topping that pipes beautifully.
Tools & Equipment Needed
Essential Tools
- Cupcake pan
- Cupcake liners
- Mixing bowls
- Electric mixer
- Measuring cups
- Measuring spoons
- Rubber spatula
- Whisk
- Spoon or cookie scoop
Optional Helpful Tools
- Piping bag
- Decorative piping tip
- Offset spatula
- Cooling rack
Step-by-Step Instructions
1. Prepare the Oven and Pan
Preheat oven to 325°F (162°C). Add cupcake liners to a cupcake pan.
2. Make the Crust
Combine the vanilla wafer cookie crumbs, sugar, and melted butter in a bowl until evenly combined.
Divide the mixture between the cupcake liners, using about 2 tablespoons per cup. Press the crumbs firmly into the bottoms to create compact crusts.
Bake the crusts for 5 minutes, then remove from the oven and allow them to cool while preparing the filling.
3. Reduce Oven Temperature
Reduce the oven temperature to 300°F (148°C).
4. Make the Cheesecake Filling
In a large bowl, mix the cream cheese, sugar, and flour until combined. Use low speed to keep excess air from getting into the batter, which helps prevent cracks.
Scrape down the sides of the bowl thoroughly.
Add the sour cream and vanilla extract. Beat on low speed until fully combined and smooth.
Add the eggs one at a time, beating slowly after each addition and scraping the bowl between additions.
5. Color the Batter
Divide the batter evenly into three bowls.
Leave one bowl plain white.
Color one bowl red using red gel icing color.
Color the remaining bowl blue using blue gel icing color.
Mix gently until the colors are evenly distributed.
6. Layer the Cheesecakes
Add 1 tablespoon of white batter into each cupcake liner over the crust.
Top with 1 tablespoon of red batter.
Finish with 1 tablespoon of blue batter.
The liners should be mostly full after layering.
7. Bake the Cheesecakes
Bake the cheesecakes for 18–20 minutes.
Turn off the oven and leave the oven door closed for another 10 minutes.
Afterward, crack the oven door and allow the cheesecakes to cool inside the oven for 15–20 minutes.
Transfer the cheesecakes to the refrigerator to finish cooling completely.
8. Remove from the Pan
Once fully cooled, carefully remove the mini cheesecakes from the cupcake pan.
9. Make the Whipped Cream
Add the cold heavy whipping cream, powdered sugar, and vanilla extract to a large mixing bowl.
Whip on high speed until stiff peaks form.
10. Decorate and Serve
Pipe the whipped cream onto the tops of the cheesecakes.
Finish with sprinkles.
Refrigerate in an airtight container until ready to serve.
Cheesecakes are best within 2–3 days.
Tips & Variations
Vegetarian Option
These Red, White and Blue Mini Cheesecakes are already vegetarian-friendly as written.
Gluten-Free Option
Use gluten-free vanilla wafer cookies to make the crust gluten-free while keeping the recipe structure intact.
Dairy-Free Option
You can experiment with dairy-free cream cheese and dairy-free sour cream alternatives, though texture may vary slightly.
Color Adjustments
Gel icing colors provide the boldest colors without affecting batter consistency. Regular food coloring may also be used if needed.
Seasonal Variations
Swap the sprinkle colors for different holidays or celebrations while maintaining the original cheesecake recipe.
Flavor Profile
These Red, White and Blue Mini Cheesecakes deliver everything people love about classic cheesecake in a playful layered dessert. The cheesecake filling is rich, smooth, and creamy with subtle tanginess from the sour cream and warmth from the vanilla extract.
The vanilla wafer crust adds buttery sweetness and soft crunch that balances the silky filling perfectly. The whipped cream topping lightens each bite with airy texture while the sprinkles add festive color and a tiny bit of crunch.
As the cheesecakes chill, the flavors deepen and become even creamier, creating a dessert that feels indulgent while remaining light enough for summer celebrations.
Nutritional Overview
Estimated Nutrition Per Serving
- Calories: 220
- Protein: 3g
- Carbohydrates: 22g
- Fat: 14g
- Fiber: 0g
Dietary Notes
- Vegetarian
- Nut-free
- Party-friendly
- Make-ahead friendly
Make-Ahead & Meal Prep Tips
These mini cheesecakes are ideal for preparing ahead of parties and gatherings.
What Can Be Prepared Early
- The crusts can be baked ahead of time.
- Cheesecakes can be baked and chilled the day before serving.
- Whipped cream can be prepared shortly before decorating.
Storage Instructions
Store the cheesecakes in an airtight container in the refrigerator.
They are best enjoyed within 2–3 days.
Reheating Information
These cheesecakes are served chilled and do not require reheating.
FAQs
Can I make these mini cheesecakes ahead of time?
Yes. They are excellent make-ahead desserts and taste even better once fully chilled.
Why should the cream cheese be room temperature?
Room temperature cream cheese blends more smoothly and prevents lumps in the batter.
Can I use regular food coloring instead of gel icing color?
Yes. Regular food coloring can be used if gel icing color is unavailable.
How do I prevent cheesecake cracks?
Use low mixing speed and avoid overmixing the batter to reduce excess air.
Can I freeze mini cheesecakes?
Yes. Freeze without whipped cream topping for best texture
How do I know when the cheesecakes are done baking?
The centers should be mostly set with a slight jiggle remaining.
Cooking Timeline
| Task | Time |
|---|---|
| Prep Time | 20 minutes |
| Cook Time | 30 minutes |
| Total Time | 50 minutes |
| Servings | 12 mini cheesecakes |
Serving Suggestions
These mini cheesecakes look beautiful arranged on a large dessert platter with extra sprinkles scattered around the serving tray.
Plating Ideas
- Arrange on a white serving platter to highlight the colorful layers.
- Serve chilled directly from decorative cupcake liners.
- Add extra whipped cream swirls for elegant presentation.
Garnish Tips
- Top each cheesecake generously with sprinkles just before serving.
- Pipe whipped cream using a star tip for bakery-style decoration.
Entertaining Suggestions
These mini cheesecakes are ideal for:
- Fourth of July parties
- Memorial Day celebrations
- Labor Day cookouts
- Summer birthdays
- Patriotic dessert tables
Recipe Variations
Swirled Cheesecake Version
Instead of layered colors, gently swirl the red, white, and blue batter together for a marbled appearance.
Extra Creamy Mini Cheesecakes
Allow the cheesecakes to chill overnight for an even richer texture.
Crunchy Topping Variation
Add additional sprinkles right before serving for extra crunch and color contrast.
Decorative Dessert Tray
Arrange the mini cheesecakes with alternating sprinkle designs for a festive dessert display.
Ingredient Spotlight
Cream Cheese
Cream cheese forms the rich foundation of these mini cheesecakes.
How to Select Cream Cheese
Choose full-fat block-style cream cheese for the smoothest and richest texture.
Storage Tips
Keep refrigerated and allow it to come to room temperature before mixing.
Why It Matters
Cream cheese creates the luxurious texture and signature flavor that defines cheesecake.
Vanilla Wafer Cookie Crumbs
These crumbs form the buttery crust foundation that supports the creamy filling.
How to Select Vanilla Wafers
Use crisp vanilla wafer cookies with fresh vanilla aroma for the best flavor.
Storage Tips
Store crushed crumbs in an airtight container if preparing ahead.
Flavor Importance
The sweet buttery crust balances the tanginess of the cheesecake filling perfectly.
Pro Cooking Tips
Use Low Mixing Speed
Overmixing incorporates excess air into cheesecake batter, increasing the chance of cracks.
Scrape the Bowl Frequently
This ensures the batter stays smooth and evenly blended.
Chill Thoroughly
Fully chilled cheesecakes develop better texture and cleaner flavor.
Pipe Whipped Cream Just Before Serving
Fresh whipped cream holds its shape best shortly before serving.
Use Gel Coloring Carefully
Start with small amounts of gel color and build gradually for vibrant shades.
Storage & Freezing Guide
Refrigerator Storage
Store cheesecakes in an airtight container in the refrigerator for up to 3 days.
Freezer Storage
Freeze undecorated cheesecakes for up to 2 months.
Best Freezing Method
Wrap cooled cheesecakes individually before storing in freezer-safe containers.
Thawing Instructions
Thaw overnight in the refrigerator before decorating and serving.
What Not to Freeze
Whipped cream topping and sprinkles are best added fresh after thawing.
Nutrition Estimate Table (Per Serving)
| Nutrient | Amount |
|---|---|
| Calories | 220 |
| Protein | 3g |
| Carbs | 22g |
| Fat | 14g |
| Fiber | 0g |
Dietary Notes
- Vegetarian
- Nut-free
- Party dessert
- Make-ahead friendly
Expanded Conclusion
These Easy Red, White and Blue Mini Cheesecakes combine festive presentation with classic creamy cheesecake flavor in the most delightful way. From the buttery vanilla wafer crust to the colorful cheesecake layers and fluffy whipped cream topping, every bite feels celebratory, rich, and irresistibly smooth.
One of the best things about these mini cheesecakes is how approachable they are for home bakers. The recipe uses straightforward ingredients, simple layering techniques, and individual servings that make entertaining effortless. Whether you’re preparing dessert for a patriotic holiday, family gathering, birthday celebration, or summer party, these cheesecakes instantly brighten the table and impress guests of all ages.
Their vibrant appearance makes them perfect for Pinterest-worthy dessert spreads, while the creamy texture and classic flavor guarantee they’ll disappear quickly once served. Save this Red, White and Blue Mini Cheesecakes recipe for your next celebration, share it with fellow dessert lovers, and come back again for more festive homemade desserts designed to make every occasion feel extra special.
Print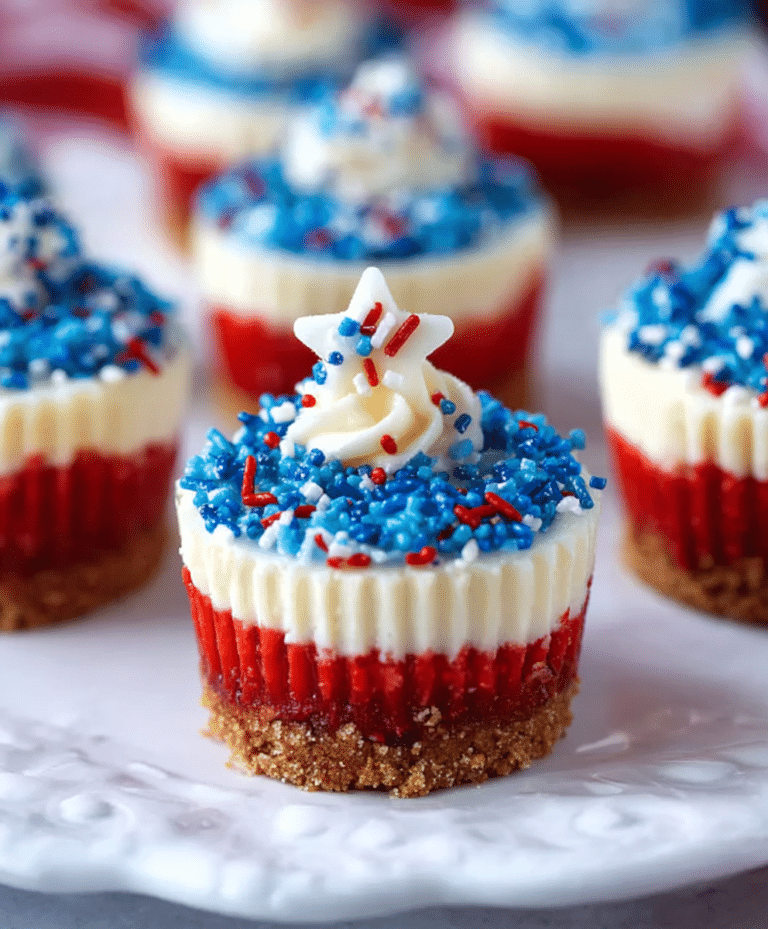
Easy Red, White and Blue Mini Cheesecakes – Festive Homemade Party Dessert
These Red, White and Blue Mini Cheesecakes are a festive and creamy dessert perfect for patriotic celebrations, summer parties, and holidays. Featuring colorful cheesecake layers on a buttery vanilla wafer crust, each mini cheesecake is topped with fluffy whipped cream and sprinkles for a fun and delicious finish.
- Total Time: 50 minutes
- Yield: 12 mini cheesecakes 1x
Ingredients
- 1 cup (134g) vanilla wafer cookie crumbs
- 2 tbsp (26g) sugar
- 4 tbsp (56g) butter, melted
- 12 ounces (339g) cream cheese, room temperature
- 1/2 cup (104g) sugar
- 3 tbsp (24g) flour
- 1/2 cup (115g) sour cream
- 1 1/2 tsp vanilla extract
- 2 eggs
- Blue gel icing color
- Red gel icing color
- 1/2 cup (120ml) heavy whipping cream, cold
- 5 tbsp (36g) powdered sugar
- 1/2 tsp vanilla extract
- Sprinkles
Instructions
- Preheat oven to 325°F (162°C). Add cupcake liners to a cupcake pan.
- Combine the vanilla wafer cookie crumbs, sugar, and melted butter. Divide the mixture evenly between the cupcake liners and press into the bottoms.
- Bake the crusts for 5 minutes, then remove from oven and allow to cool.
- Reduce oven temperature to 300°F (148°C).
- In a large bowl, mix the cream cheese, sugar, and flour on low speed until combined.
- Add the sour cream and vanilla extract and mix until smooth.
- Add the eggs one at a time, mixing slowly after each addition.
- Divide the batter evenly into three bowls. Leave one white, color one red, and color one blue.
- Layer the batter into the crusts with white first, then red, then blue.
- Bake the cheesecakes for 18–20 minutes.
- Turn off the oven and leave the door closed for 10 minutes.
- Crack the oven door and let the cheesecakes cool for 15–20 minutes before transferring to the refrigerator to chill completely.
- Once cooled, remove cheesecakes from the pan.
- To make the whipped cream topping, beat the heavy whipping cream, powdered sugar, and vanilla extract until stiff peaks form.
- Pipe whipped cream onto each cheesecake and decorate with sprinkles.
- Refrigerate until ready to serve.
Notes
- Ensure the cream cheese is fully at room temperature for a smooth filling.
- Mix on low speed to avoid incorporating too much air into the batter.
- Gel food coloring provides brighter colors without thinning the batter.
- Store cheesecakes in an airtight container in the refrigerator for up to 3 days.
- Prep Time: 20 minutes
- Cook Time: 30 minutes
- Category: Dessert
- Method: Baking
- Cuisine: American
- Diet: Vegetarian
Nutrition
- Serving Size: 1 cheesecake
- Calories: 220
- Sugar: 15 g
- Sodium: 180 mg
- Fat: 14 g
- Saturated Fat: 8 g
- Unsaturated Fat: 6 g
- Trans Fat: 0 g
- Carbohydrates: 22 g
- Fiber: 0 g
- Protein: 3 g
- Cholesterol: 50 mg